自定义扩展新功能
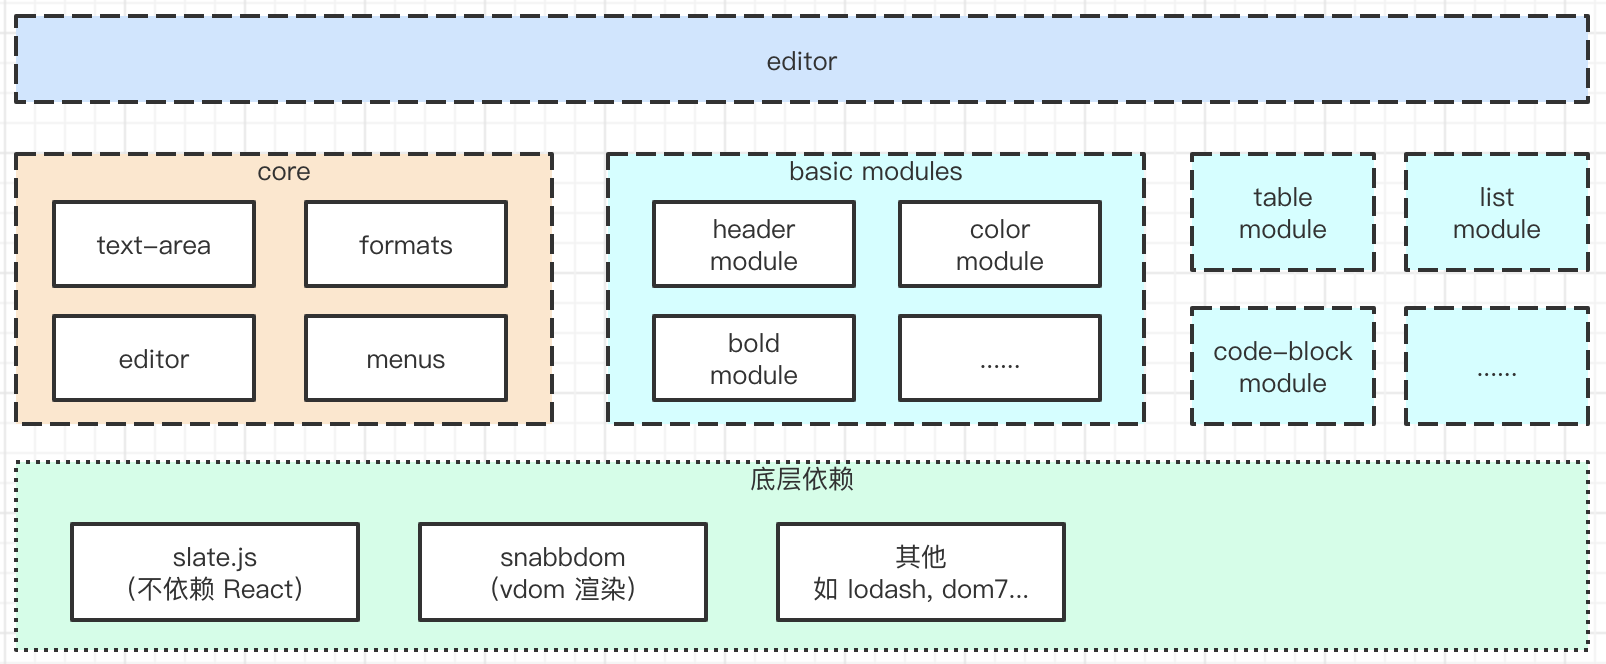
wangEditor 从 V5 开始,源码上就分离了 core editor 还有各个 module 。
core 是核心 API ,editor 负责汇总集成。所有的具体功能,都分布在各个 module 中来实现。
基于这种扩展性,官方开发了几个常用的插件,其源码也可作为二次开发的参考。
注册新菜单
菜单分为几种
- ButtonMenu 按钮菜单,如 加粗、斜体
- SelectMenu 下拉菜单,如 标题、字体、行高
- DropPanelMenu 下拉面板菜单,如 字体颜色、创建表格
- ModalMenu 弹出框菜单,如 插入链接、插入网络图片
ButtonMenu
可参考这个 demo 网页源码。在实际开发中,会用到很多 editor API 。
第一,定义菜单 class
import { IButtonMenu, IDomEditor } from '@wangeditor/editor'

class MyButtonMenu implements IButtonMenu {
  // TS 语法
  // class MyButtonMenu {                       // JS 语法

  constructor() {
    this.title = 'My menu title' // 自定义菜单标题
    // this.iconSvg = '<svg>...</svg>' // 可选
    this.tag = 'button'
  }

  // 获取菜单执行时的 value ,用不到则返回空 字符串或 false
  getValue(editor: IDomEditor): string | boolean {
    // TS 语法
    // getValue(editor) {                              // JS 语法
    return ' hello '
  }

  // 菜单是否需要激活(如选中加粗文本,“加粗”菜单会激活),用不到则返回 false
  isActive(editor: IDomEditor): boolean {
    // TS 语法
    // isActive(editor) {                    // JS 语法
    return false
  }

  // 菜单是否需要禁用(如选中 H1 ,“引用”菜单被禁用),用不到则返回 false
  isDisabled(editor: IDomEditor): boolean {
    // TS 语法
    // isDisabled(editor) {                     // JS 语法
    return false
  }

  // 点击菜单时触发的函数
  exec(editor: IDomEditor, value: string | boolean) {
    // TS 语法
    // exec(editor, value) {                              // JS 语法
    if (this.isDisabled(editor)) return
    editor.insertText(value) // value 即 this.value(editor) 的返回值
  }
}
第三,插入菜单到工具栏
到此,自定义菜单就已经注册成功了,参考这个 demo
SelectMenu
可参考这个 demo 网页源码。在实际开发中,会用到很多 editor API 。
第一,定义菜单 class
import { IDomEditor, ISelectMenu } from '@wangeditor/editor'

class MySelectMenu implements ISelectMenu {
  // TS 语法
  // class MySelectMenu {                       // JS 语法

  constructor() {
    ;(this.title = 'My Select Menu'), (this.tag = 'select')
    this.width = 60
  }

  // 下拉框的选项
  getOptions(editor: IDomEditor) {
    // TS 语法
    // getOptions(editor) {            // JS 语法
    const options = [
      {
        value: 'beijing',
        text: '北京',
        styleForRenderMenuList: { 'font-size': '32px', 'font-weight': 'bold' },
      },
      { value: 'shanghai', text: '上海', selected: true },
      { value: 'shenzhen', text: '深圳' },
    ]
    return options
  }

  // 菜单是否需要激活(如选中加粗文本,“加粗”菜单会激活),用不到则返回 false
  isActive(editor: IDomEditor): boolean {
    // TS 语法
    // isActive(editor) {                      // JS 语法
    return false
  }

  // 获取菜单执行时的 value ,用不到则返回空 字符串或 false
  getValue(editor: IDomEditor): string | boolean {
    // TS 语法
    // getValue(editor) {                               // JS 语法
    return 'shanghai' // 匹配 options 其中一个 value
  }

  // 菜单是否需要禁用(如选中 H1 ,“引用”菜单被禁用),用不到则返回 false
  isDisabled(editor: IDomEditor): boolean {
    // TS 语法
    // isDisabled(editor) {                     // JS 语法
    return false
  }

  // 点击菜单时触发的函数
  exec(editor: IDomEditor, value: string | boolean) {
    // TS 语法
    // exec(editor, value) {                              // JS 语法
    // Select menu ,这个函数不用写,空着即可
  }
}
第三,插入菜单到工具栏
到此,自定义菜单就已经注册成功了,参考这个 demo
DropPanelMenu
可参考这个 demo 网页源码。在实际开发中,会用到很多 editor API 。
第一,定义菜单 class
import { IDomEditor, IDropPanelMenu } from '@wangeditor/editor'

class MyDropPanelMenu implements IDropPanelMenu {
  // TS 语法
  // class MyDropPanelMenu {                           // JS 语法

  constructor() {
    this.title = 'My menu'
    // this.iconSvg = '<svg >...</svg>'
    this.tag = 'button'
    this.showDropPanel = true
  }

  // 菜单是否需要激活(如选中加粗文本,“加粗”菜单会激活),用不到则返回 false
  isActive(editor: IDomEditor): boolean {
    // TS 语法
    // isActive(editor) {                      // JS 语法
    return false
  }

  // 获取菜单执行时的 value ,用不到则返回空 字符串或 false
  getValue(editor: IDomEditor): string | boolean {
    // TS 语法
    // getValue(editor) {                               // JS 语法
    return ''
  }

  // 菜单是否需要禁用(如选中 H1 ,“引用”菜单被禁用),用不到则返回 false
  isDisabled(editor: IDomEditor): boolean {
    // TS 语法
    // isDisabled(editor) {                     // JS 语法
    return false
  }

  // 点击菜单时触发的函数
  exec(editor: IDomEditor, value: string | boolean) {
    // TS 语法
    // exec(editor, value) {                              // JS 语法
    // DropPanel menu ,这个函数不用写,空着即可
  }

  // 定义 DropPanel 内部的 DOM Element
  getPanelContentElem(editor: IDomEditor): DOMElement {
    // TS 语法
    // getPanelContentElem(editor) {                        // JS 语法
    const $list = $(`<ul>
            <li>北京</li> <li>上海</li> <li>深圳</li>
          </ul>`)

    $list.on('click', 'li', function () {
      editor.insertText(this.innerHTML)
      editor.insertText(' ')
    })

    return $list[0] // 返回 DOM Element 类型

    // PS:也可以把 $list 缓存下来,这样不用每次重复创建、重复绑定事件,优化性能
  }
}
第三,插入菜单到工具栏
到此,自定义菜单就已经注册成功了,参考这个 demo
ModalMenu
可参考这个 demo 网页源码。在实际开发中,会用到很多 editor API 。
第一,定义菜单 class
import { IDomEditor, IModalMenu, SlateNode } from '@wangeditor/editor'

class MyModalMenu implements IModalMenu {
  // TS 语法
  // class MyModalMenu {                       // JS 语法

  constructor() {
    this.title = 'My menu'
    // this.iconSvg = '<svg >...</svg>'
    this.tag = 'button'
    this.showModal = true
    this.modalWidth = 300
  }

  // 菜单是否需要激活(如选中加粗文本,“加粗”菜单会激活),用不到则返回 false
  isActive(editor: IDomEditor): boolean {
    // TS 语法
    // isActive(editor) {                      // JS 语法
    return false
  }

  // 获取菜单执行时的 value ,用不到则返回空 字符串或 false
  getValue(editor: IDomEditor): string | boolean {
    // TS 语法
    // getValue(editor) {                               // JS 语法
    return ''
  }

  // 菜单是否需要禁用(如选中 H1 ,“引用”菜单被禁用),用不到则返回 false
  isDisabled(editor: IDomEditor): boolean {
    // TS 语法
    // isDisabled(editor) {                     // JS 语法
    return false
  }

  // 点击菜单时触发的函数
  exec(editor: IDomEditor, value: string | boolean) {
    // TS 语法
    // exec(editor, value) {                              // JS 语法
    // Modal menu ,这个函数不用写,空着即可
  }

  // 弹出框 modal 的定位:1. 返回某一个 SlateNode; 2. 返回 null (根据当前选区自动定位)
  getModalPositionNode(editor: IDomEditor): SlateNode | null {
    // TS 语法
    // getModalPositionNode(editor) {                             // JS 语法
    return null // modal 依据选区定位
  }

  // 定义 modal 内部的 DOM Element
  getModalContentElem(editor: IDomEditor): DOMElement {
    // TS 语法
    // getModalContentElem(editor) {                        // JS 语法

    const $content = $('<div></div>')
    const $button = $('<button>do something</button>')
    $content.append($button)

    $button.on('click', () => {
      editor.insertText(' hello ')
    })

    return $content[0] // 返回 DOM Element 类型

    // PS:也可以把 $content 缓存下来,这样不用每次重复创建、重复绑定事件,优化性能
  }
}
第三,插入菜单到工具栏
到此,自定义菜单就已经注册成功了,参考这个 demo
用 Vue React 组件实现 modal
如果你用 Vue React 开发了 modal 组件,想通过菜单来显示/隐藏
- 不用 ModalMenu ,改用最简单的 ButtonMenu
- 在
exec函数中通过自定义事件(或其他方式)来控制 modal 组件的显示和隐藏
可再参考这个分享:在 React 中更方便的扩展 Menu ,替代原有的 ModalMenu 方案
注册菜单到 wangEditor
先根据菜单 class 来定义菜单配置
const menu1Conf = {
  key: 'menu1', // 定义 menu key :要保证唯一、不重复(重要)
  factory() {
    return new YourMenuClass() // 把 `YourMenuClass` 替换为你菜单的 class
  },
}
// const menu2Conf = { ... }
// const menu3Conf = { ... }
然后,再把菜单注册到 wangEditor 。有两种选择:
第一,如果只注册一个菜单,没有别的功能了,则推荐使用 registerMenu
import { Boot } from '@wangeditor/editor'

Boot.registerMenu(menu1Conf)
第二,如果除了菜单之外还要同时注册其他能力,则建议使用 registerModule
import { Boot, IModuleConf } from '@wangeditor/editor'

const module: Partial<IModuleConf> = {
  // TS 语法
  // const module = {                      // JS 语法

  menus: [menu1Conf, menu2Conf, menu3Conf],

  // 其他功能,下文讲解...
}
Boot.registerModule(module)
TIP
- 必须在创建编辑器之前注册
- 全局只能注册一次,不要重复注册
插入菜单到工具栏
在创建编辑器(或渲染 Vue React 组件时)注册到工具栏,可选择以下方式
- 注册到工具栏 insertKeys
- 注册到悬浮菜单 hoverbarKeys
劫持编辑器事件和操作(插件)
如支持 markdown 语法,以及 ctrl + enter 回车等。可参考它们的源码。
定义插件
在实际开发中,会用到很多 editor API 。
import { IDomEditor } from '@wangeditor/editor'

function withBreakAndDelete<T extends IDomEditor>(editor: T): T {
  // TS 语法
  // function withBreakAndDelete(editor) {                            // JS 语法

  const { insertBreak, deleteBackward } = editor // 获取当前 editor API
  const newEditor = editor

  // 重写 insertBreak 换行
  newEditor.insertBreak = () => {
    // if: 是 ctrl + enter ,则执行 insertBreak
    insertBreak()

    // else: 则不执行换行
    return
  }

  // 重写 deleteBackward 向后删除
  newEditor.deleteBackward = (unit) => {
    // if: 某种情况下,执行默认的删除
    deleteBackward(unit)

    // else: 其他情况,则不执行删除
    return
  }

  // 重写其他 API ...

  // 返回 newEditor ,重要!
  return newEditor
}
注册插件到 wangEditor
有两种方式。
第一,如果你仅仅注册一个插件,没有别的需求,则推荐使用 registerPlugin
import { Boot } from '@wangeditor/editor'

Boot.registerPlugin(withBreakAndDelete)
第二,如果你除了注册插件之外,同时还注册其他功能,则推荐使用 registerModule
import { Boot, IModuleConf } from '@wangeditor/editor'

const module: Partial<IModuleConf> = {
  // TS 语法
  // const module = {                      // JS 语法

  // menus: [menu1Conf, menu2Conf, menu3Conf], // 菜单
  editorPlugin: withBreakAndDelete, // 插件

  // 其他功能,下文讲解...
}
Boot.registerModule(module)
TIP
- 必须在创建编辑器之前注册
- 全局只能注册一次,不要重复注册
至此一个插件就注册完成,可以监听编辑器的 insertBreak 和 deleteBackward 事件。
定义新元素
编辑器默认只有基本的标题、列表、文字、图片、表格等元素,如果你想让编辑器渲染一个新元素,如 附件 数学公式 链接卡片 等,你就需要根据本节内容来定义。
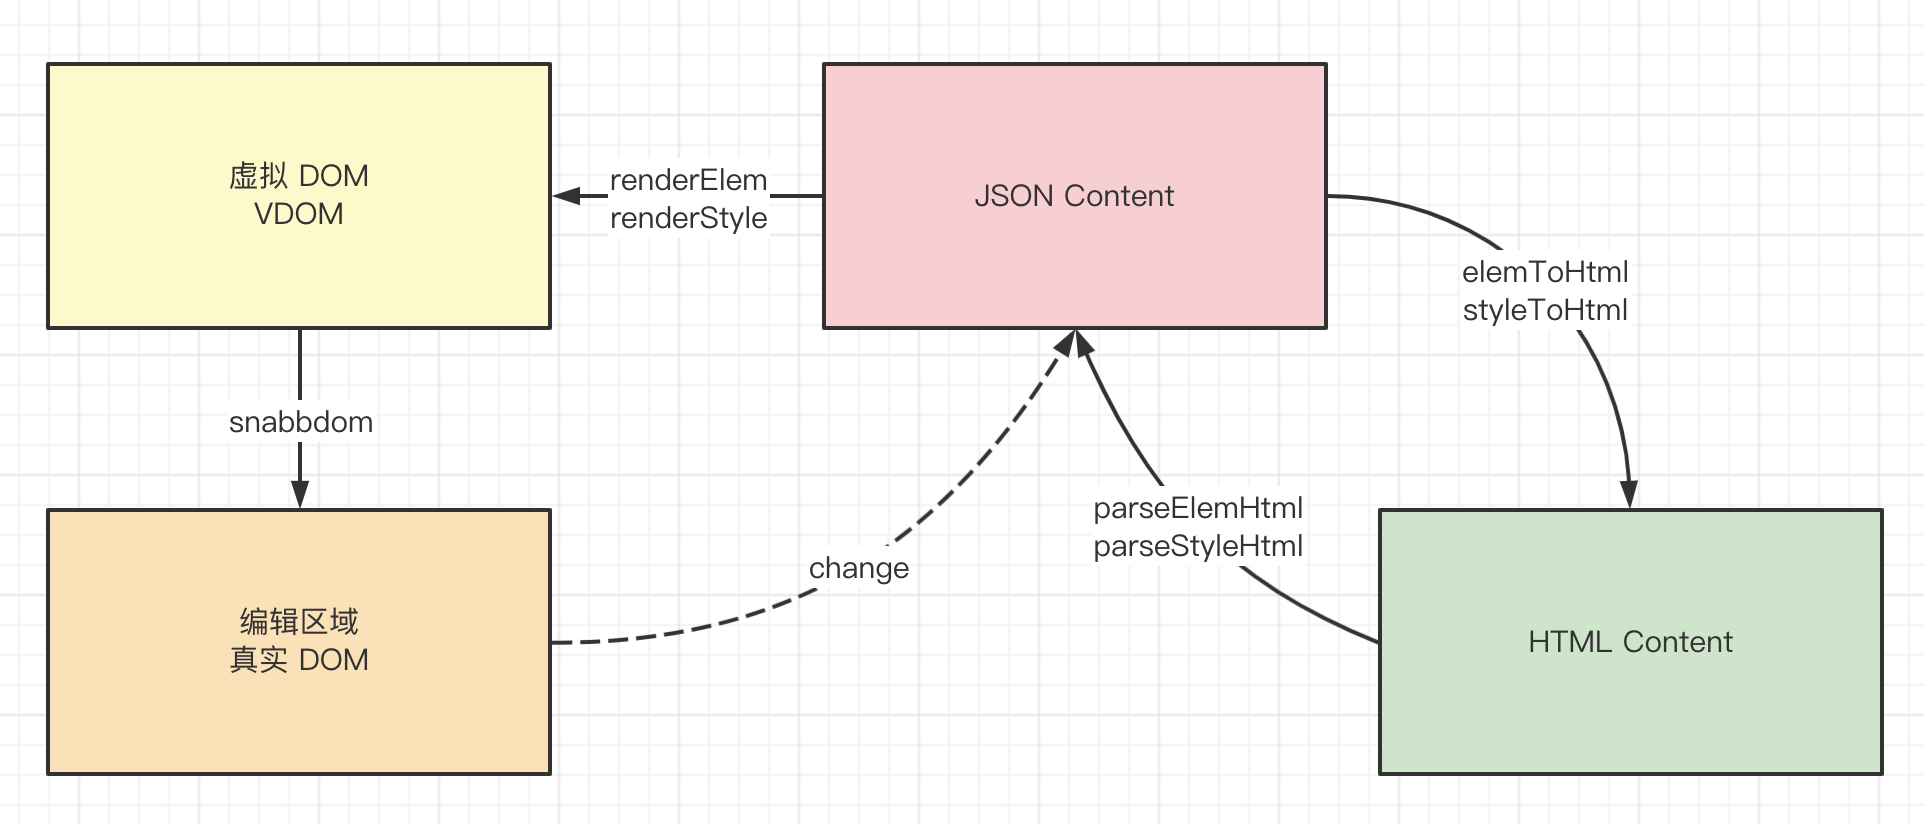
编辑器的输入和输出通常都是 HTML ,但其内部却有复杂的渲染机制,主要过程是:model -> 生成 vdom -> 渲染 DOM,如下图。
所以,我们也需要了解很多知识,定义很多函数来完成这一功能。不过别担心,它其实并难理解,跟着文档一步一步操作即可。
定义节点数据结构
数据驱动视图,这也是 Vue React 设计思路。要想显示什么,必须先定义相应的数据结构。
在此需要你详细了解 wangEditor 节点数据结构的相关知识,并熟悉以下知识点:
- Text node 和 Element node 区别
- 如何扩展 Text node 和 Element node 属性
- 如何设置 Inline node
- 如何设置 Void node ,以及它的
children有何特点
例如,对“附件”元素,我们设计为: type: 'attachment' + inline + void ,然后扩展一些必要的属性,数据结构示例:
const myResume: AttachmentElement = {  // TS 语法
// const resume = {                    // JS 语法
  type: 'attachment'
  fileName: 'resume.pdf'
  link: 'https://xxx.com/files/resume.pdf'
  children: [{ text: '' }]  // void 元素必须有一个 children ,其中只有一个空字符串,重要!!!
}
如果你使用 TS , AttachmentElement 的定义在这里。
定义 inline 和 void
我们把“附件”元素设计为 inline 和 void ,就需要在代码中体现出来。
第一,定义一个插件,重写 isInline 和 isVoid API
import { DomEditor, IDomEditor } from '@wangeditor/editor'

function withAttachment<T extends IDomEditor>(editor: T) {
  // TS 语法
  // function withAttachment(editor) {                        // JS 语法
  const { isInline, isVoid } = editor
  const newEditor = editor

  newEditor.isInline = (elem) => {
    const type = DomEditor.getNodeType(elem)
    if (type === 'attachment') return true // 针对 type: attachment ,设置为 inline
    return isInline(elem)
  }

  newEditor.isVoid = (elem) => {
    const type = DomEditor.getNodeType(elem)
    if (type === 'attachment') return true // 针对 type: attachment ,设置为 void
    return isVoid(elem)
  }

  return newEditor // 返回 newEditor ,重要!!!
}
第二,把插件 withAttachment 注册到 wangEditor ,参考上文。
在编辑器中渲染新元素
数据结构定义好了,但编辑器现在还不认识它,执行 editor.insertNode(myResume) 也不会有任何效果。接下来就需要让编辑器认识它,能根据 myResume 的数据,渲染出我们想要的 UI 界面。
安装 snabbdom.js
yarn add snabbdom --peer
## 安装到 package.json 的 peerDependencies 中即可
编辑器的内部渲染使用了 VDOM 技术,snabbdom.js 是一个优秀的 VDOM diff 工具。
我们主要会用到它的 h 函数,你可以先在文档中了解一下。
定义 renderElem 函数
以下是“附件”元素 renderElem 的代码示例,完整代码请参考它的源码
import { h, VNode } from 'snabbdom'
import { IDomEditor, SlateElement } from '@wangeditor/editor'

/**
 * 渲染“附件”元素到编辑器
 * @param elem 附件元素,即上文的 myResume
 * @param children 元素子节点,void 元素可忽略
 * @param editor 编辑器实例
 * @returns vnode 节点(通过 snabbdom.js 的 h 函数生成)
 */
function renderAttachment(elem: SlateElement, children: VNode[] | null, editor: IDomEditor): VNode {  // TS 语法
// function renderAttachment(elem, children, editor) {                                                // JS 语法

    // 获取“附件”的数据,参考上文 myResume 数据结构
    const { fileName = '', link = '' } = elem

    // 附件 icon 图标 vnode
    const iconVnode = h(
        // HTML tag
        'img',
        // HTML 属性
        {
            props: { src: 'xxxx.png' } // HTML 属性,驼峰式写法
            style: { width: '1em', marginRight: '0.1em',  /* 其他... */ } // HTML style ,驼峰式写法
        }
        // img 没有子节点,所以第三个参数不用写
    )

    // 附件元素 vnode
    const attachVnode = h(
        // HTML tag
        'span',
        // HTML 属性、样式、事件
        {
            props: { contentEditable: false }, // HTML 属性,驼峰式写法
            style: { display: 'inline-block', marginLeft: '3px', /* 其他... */ }, // style ,驼峰式写法
            on: { click() { console.log('clicked', link) }, /* 其他... */ }
        },
        // 子节点
        [ iconVnode, fileName ]
    )

    return attachVnode
}
注册 renderElem 到 wangEditor
先定义 renderElem 配置
const renderElemConf = {
  type: 'attachment', // 新元素 type ,重要!!!
  renderElem: renderAttachment,
}
然后把 renderElemConf 注册到 wangEditor ,有两种方式。
第一,如果你只想注册一个 renderElem ,没有其他功能,推荐使用 registerRenderElem
import { Boot } from '@wangeditor/editor'

Boot.registerRenderElem(renderElemConf)
第二,如果你除了 renderElem 同时还要注册其他功能,推荐使用 registerModule
import { Boot, IModuleConf } from '@wangeditor/editor'

const module: Partial<IModuleConf> = {
  // TS 语法
  // const module = {                      // JS 语法

  // menus: [menu1Conf, menu2Conf, menu3Conf], // 菜单
  // editorPlugin: withBreakAndDelete, // 插件
  renderElems: [renderElemConf /* 其他元素... */], // renderElem

  // 其他功能,下文讲解...
}
Boot.registerModule(module)
TIP
- 必须在创建编辑器之前注册
- 全局只能注册一次,不要重复注册
此时,你再执行 editor.insertNode(myResume) 就可以看到“附件”元素被渲染到了编辑器中。
把新元素转换为 HTML
当你把 myResume 插入到编辑器,并渲染成功,此时执行 editor.getHtml() 获取的 HTML 里并没有“附件”元素。接下来需要定义如何输入 HTML 。
定义 elemToHtml 函数
以下是代码示例,完整源码可参考这里
import { SlateElement } from '@wangeditor/editor'

/**
 * 生成“附件”元素的 HTML
 * @param elem 附件元素,即上文的 myResume
 * @param childrenHtml 子节点的 HTML 代码,void 元素可忽略
 * @returns “附件”元素的 HTML 字符串
 */
function attachmentToHtml(elem: SlateElement, childrenHtml: string): string {
  // TS 语法
  // function attachmentToHtml(elem, childrenHtml) {                             // JS 语法

  // 获取附件元素的数据
  const { link = '', fileName = '' } = elem

  // 生成 HTML 代码
  const html = `<span
        data-w-e-type="attachment"
        data-w-e-is-void
        data-w-e-is-inline
        data-link="${link}"
        data-fileName="${fileName}"
    >${fileName}</span>`

  return html
}
注意以下事项:
- 自定义元素生成的 HTML tag 尽量使用
<div>(针对 block 元素) 或<span>(针对 inline 元素)等通用标签。谨慎使用<a><p><table>等编辑器默认支持的标签,那可能会带来冲突。 - 使用
data-w-e-type记录元素type,以便解析 HTML 时(下文讲)能识别到 - 使用
data-w-e-is-void标记元素是 void ,以便解析 HTML 时能识别 - 使用
data-w-e-is-inline标记元素是 inline ,以便解析 HTML 时能识别 - HTML 结构尽量扁平、简洁,这样更容易解析 HTML ,更稳定
注册 elemToHtml 到 wangEditor
先定义 elemToHtml 配置
const elemToHtmlConf = {
  type: 'attachment', // 新元素的 type ,重要!!!
  elemToHtml: attachmentToHtml,
}
然后注册到 wangEditor ,有两种方式
第一,如果你只想注册 elemToHtml ,没有其他需求,则推荐使用 registerElemToHtml
import { Boot } from '@wangeditor/editor'

Boot.registerElemToHtml(elemToHtmlConf)
第二,如果你除了注册 elemToHtml 之外,还需要注册其他功能,则推荐使用 registerModule
import { Boot, IModuleConf } from '@wangeditor/editor'

const module: Partial<IModuleConf> = {
  // TS 语法
  // const module = {                      // JS 语法

  // menus: [menu1Conf, menu2Conf, menu3Conf], // 菜单
  // editorPlugin: withBreakAndDelete, // 插件
  // renderElems: [renderElemConf],    // renderElem
  elemsToHtml: [elemToHtmlConf /* 其他元素... */], // elemToHtml

  // 其他功能,下文讲解...
}
Boot.registerModule(module)
TIP
- 必须在创建编辑器之前注册
- 全局只能注册一次,不要重复注册
此时,你再执行 editor.getHtml() 即可得到“附件”元素的 HTML 代码,显示 HTML 时可配合 JS 实现点击下载附件的效果。
解析新元素 HTML 到编辑器
通过 const html = editor.getHtml() 可以得到正确的 HTML ,但再去设置 HTML editor.setHtml(html) 却无效。需要你自定义解析 HTML 的逻辑。
定义 parseElemHtml 函数
import { IDomEditor, SlateDescendant, SlateElement } from '@wangeditor/editor'

/**
 * 解析 HTML 字符串,生成“附件”元素
 * @param domElem HTML 对应的 DOM Element
 * @param children 子节点
 * @param editor editor 实例
 * @returns “附件”元素,如上文的 myResume
 */
function parseAttachmentHtml(
  domElem: Element,
  children: SlateDescendant[],
  editor: IDomEditor
): SlateElement {
  // TS 语法
  // function parseAttachmentHtml(domElem, children, editor) {                                                     // JS 语法

  // 从 DOM element 中获取“附件”的信息
  const link = domElem.getAttribute('data-link') || ''
  const fileName = domElem.getAttribute('data-fileName') || ''

  // 生成“附件”元素(按照此前约定的数据结构)
  const myResume = {
    type: 'attachment',
    link,
    fileName,
    children: [{ text: '' }], // void node 必须有 children ,其中有一个空字符串,重要!!!
  }

  return myResume
}
注册 parseElemHtml 到 wangEditor
先定义 parseHtml 配置
const parseHtmlConf = {
  selector: 'span[data-w-e-type="attachment"]', // CSS 选择器,匹配特定的 HTML 标签
  parseElemHtml: parseAttachmentHtml,
}
然后把 parseHtmlConf 注册到 wangEditor ,有两种方式:
第一,如果你只想注册一个 parseElemHtml ,没有别的功能,则推荐 registerParseElemHtml
import { Boot } from '@wangeditor/editor'

Boot.registerParseElemHtml(parseHtmlConf)
第二,如果你除了想注册 parseElemHtml ,还想注册其他功能,则推荐 registerModule
import { Boot, IModuleConf } from '@wangeditor/editor'

const module: Partial<IModuleConf> = {
  // TS 语法
  // const module = {                      // JS 语法

  // menus: [menu1Conf, menu2Conf, menu3Conf], // 菜单
  // editorPlugin: withBreakAndDelete, // 插件
  // renderElems: [renderElemConf],    // renderElem
  // elemsToHtml: [elemToHtmlConf],    // elemToHtml
  parseElemsHtml: [parseHtmlConf /* 其他元素... */], // parseElemHtml
}
Boot.registerModule(module)
TIP
- 必须在创建编辑器之前注册
- 全局只能注册一次,不要重复注册
此时,再把获取的 HTML 设置到编辑器中 editor.setHtml(html) 即可成功显示“附件”元素。
总结
一个模块常用代码文件如下,共选择参考(不一定都用到)
- render-elem.ts
- elem-to-html.ts
- parse-elem-html.ts
- plugin.ts
- menu/
- Menu1.ts
- Menu2.ts